How to connect a web API

NOTE: this feature is in BETA; things might change.

Overview

Sometimes it can be useful to interact with a web (REST) API to integrate with one of your external tools. The 'connect API flow' in the button element allows you how to send HTTP requests to external services.

What are REST APIs?

REST APIs are a way for computers to send and receive data on the web. Whereas humans would use an app or browser like Chrome or Firefox to navigate to a webpage and read content, computer programs do not need such user interfaces to achieve the same outcome. This means REST APIs allow one computer program to interact with another computer program over the web.

How to connect an API

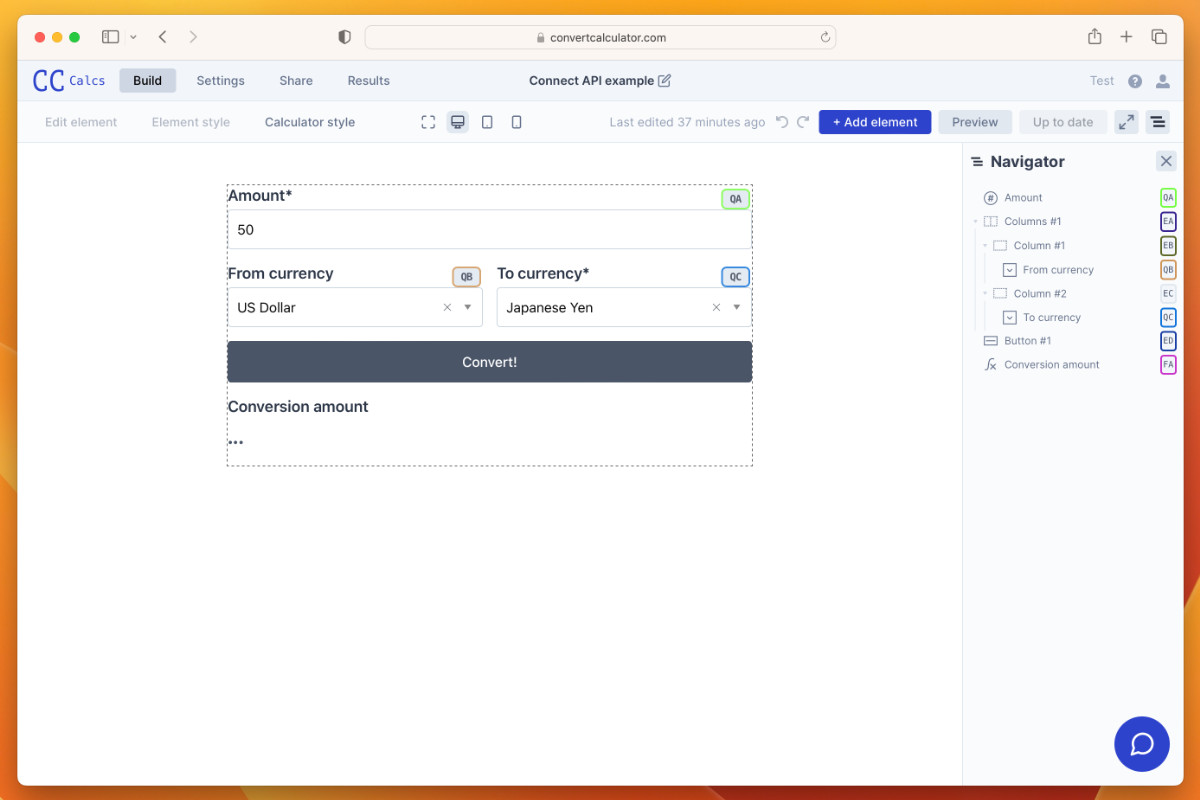
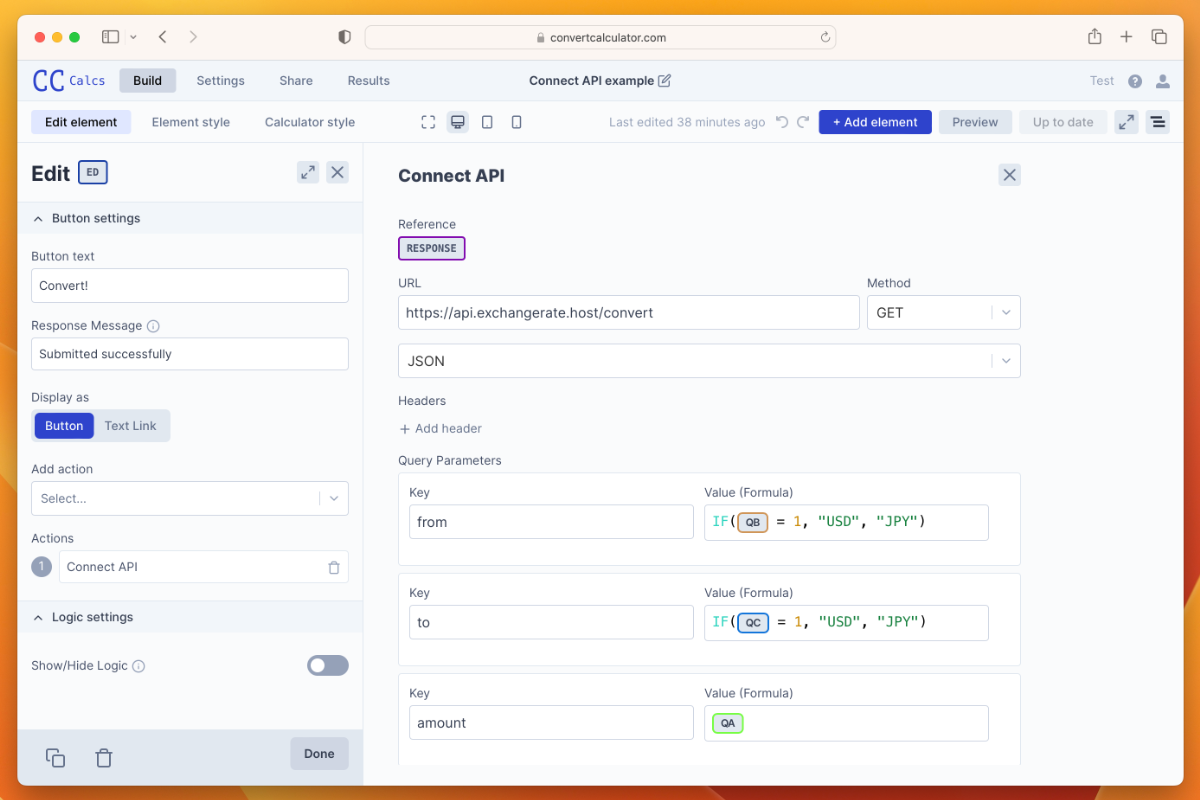
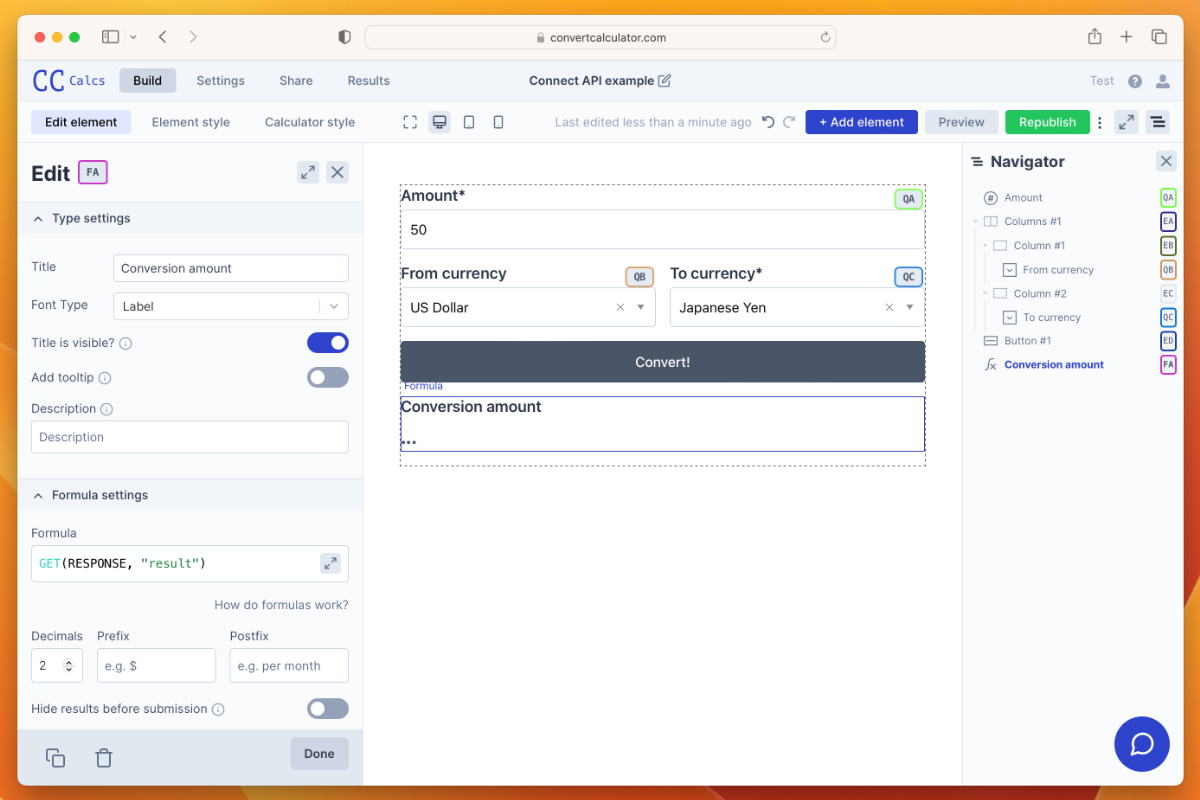
You can connect an API in your calculator through the button element's connect API flow. This flow allows you to send an HTTP request when a button is pressed - allowing you to use the response as a variable in your formulas. Follow these steps to add a button element, with the connect API flow enabled, to your calculator.

  1. Open de add element menu by pressing the add element button in the top right corner.
  2. Scroll to the Elements section and click on the button element.
  3. Open the button element settings by selecting the element on the canvas.
  4. Scroll to the add action section in the settings and select Connect API.

Following these steps will bring you to the Connect API visual interface.

Example

The next part will teach you how to connect an API in this interface. The example will use the free exchangerate.host API, but beware that every API will have differences and ensure you properly read the API's documentation. The documentation for this API is located here: https://exchangerate.host/#/#docs

Let's consider the following calculator in which we would like to integrate the exchange rate API.

It is a simple calculator that allows a user to enter an amount, select the source (from) currency, the target (to) currency; to then convert according to these inputs.

How to use the connected API in your calculator

API connection structure

Reference

The reference is the name by which the response will be available in your formulas. The reference can be changed (and, in fact, has been changed in this example) by clicking on it.

URL

The URL is the web address at which the REST API is hosted. This information should be available in your service's documentation.

Method

The method is the type of request you are sending to the API. Often when sending data, you would use a POST request. This information should be available in your API service's documentation. This example uses a GET request.

Headers

Headers are a part of the web request, often used to send the authentication data. This example uses a fake Authorization token. Note that a HEADER value is a formula, so if you just want textual data, you must enclose it in quotes "like this" and not like this.

Data

'Data' are the values you want to send to the API. They are specific to your use case. Again, note that the values are formulas.

Nested data

The provided data fields in the UI are only sufficient if the data needs to be flat, where each field maps to a value. However, some APIs require nested data in their request bodies. There are two forms of nested data:

  1. Arrays: a collection of data -> [1, "value", true, 23]
  2. Objects: a mapping of data to names -> { "key1": "value1", "nested": { "nested_key1": "nested_value1" } }

It is not yet possible to add such fields in the UI, but it is possible to create them using functions, namely the ARRAY and OBJECT functions.

The ARRAY function takes any number of arguments and creates the array for you:

ARRAY(1, "value", true, 23) -> [1, "value", true, 23]

The OBJECT function takes any even number of arguments, where each odd argument will become a key and each even argument its value. Keys must always be strings (text), whereas values can be any value (even calls to other functions!).

OBJECT("key1", "value1", "nested", OBJECT("nested_key1", "nested_value1")) -> { "key1": "value1", "nested": { "nested_key1": "nested_value1" } }

Query parameters

In this example, amount refers to the amount you want to convert, and it is set to QA in the number input field in the calculator.

from refers to the from currency and is set to a formula that either results in "USD" for US Dollars and "JPY" for Japanese Yen based on the QB dropdown.

to same as from, but then on the QC dropdown.

Retrieving the data

After setting up the connection, it is time to use the response data in your calculator. Remember that the data is accessible through the variable name RESPONSE. This calculator displays the conversion result underneath the button in a formula. The exchangerate.host API gives the following response structure:

{ "date": "2022-11-07", "historical": false, "info": { "rate": 1.005716 }, "motd": { "msg": "If you or your company use this project or like what we are doing, please consider backing us so we can continue maintaining and evolving this project.", "url": "https://exchangerate.host/#/donate" }, "query": { "amount": 50, "from": "USD", "to": "EUR" }, "result": 50.285811, "success": true }

To extract the result, the formula needs to "match" the structure of the response. This is done using the following steps.

This example is interested in the "result" field of the response. The GET function is used to retrieve this value.

GET(RESPONSE, "result")

NOTE: in the editor you will see an error because the response data is only available after the button has been pressed.

Example calculator

Related articles

Learn more about connect a rest api in one of the following articles